Wednesday, August 15, 2012

Add Google Adsense ads Below Post Titles in Blogger


google adsense


Google Adsense is the top most ads publishing network throughout the web today. Maximum earnings of almost all the bloggers are being obtained from none other than Google adsense ads and that is why every bloggers represent Google adsense as the maximum revenue generator. That doesn't mean that placing the adsense ads everywhere on your blog gets you maximum revenue. Adsense ads must be placed officially and elegantly to gain more clicks, thus generating more income.


One of the best ad slot choosed by each and every bloggers is, placing the adsense ads just below the post title and before the post body thus ensuring maximum exposure and more attraction towards it. In this post, I am going to give you the tutorial on how to place your adsense ads just below the post titles.

Google Adsense ads placement below Post Titles in Blogger

1. Go to your Google adsense dashboard and create an new ad unit with dimensions corresponding  to your blog and finally copy the html code of your ad unit.

2. Open an HTML Encoder Tool.

3. Paste your adsense code inside the box provided and copy the Encoded code.

4. Now Go to your Blogger Dashboard --> Design --> Edit Html (Tick Expand widget template option) .

5. Now Find (CTRL+F) The Below Code. 

<b:if cond='data:blog.pageType == &quot;item&quot;'> 
<style>.fullpost{display:inline;}</style>

6. Paste your Google adsense encoded code just below it like this.
<b:if cond='data:blog.pageType == &quot;item&quot;'>
<style>.fullpost{display:inline;}</style>
<div style='float:left; margin-right:5px;'>
YOUR GOOGLE ADSENSE ADS</div>


Now You can View your Google adsense ad unit appearing inside your blog posts and below your post titles when you visit a post of your Blog. 


That's It. . . . .!!!!!


Releasing Design Master - An Official Blogger Template

design master blogger template
Today i am very proud to release this grand new template on my blog. This template is created using css3, jquery, javascript, ajax, etc. . Design Master would be an premium template on themeforest but i decided to give it for free for my friends like you. Design Master is purely an official blogger Template with lot of features already included and this template suits well for any kind of niche. In fact this template took me around 4 days to complete and i can say that this is equipped with everything including social share buttons. Design Master is an 2 column template and very easy to customize any element in it. Know its features and customization by yourself below.

Features::

  • 2 column header.
  • Jquery featured navigation menu.
  • Customized post snippets with Facebook share and read more option.
  • Beautiful Egg sharing icons with mouse hover effect
  • Share buttons inside each posts.
  • Well customized related posts widget below each post.
  • Well designed lower widgets with opacity effect on mouse hover.
  • Link nudging effect and Dropcap equipped and can be used just by using <div class='link-nudge'> and <large></large> respectively.
  • Well designed sidebar titles.
  • Customized comment section with author comment highlight.
  • Customized Blockquote.
  • Threaded comment system with Reply button included.
  • Easy to change and upload background.
  • unlimited color scheme.
  • Supports all major browsers.

Preview::


design master blogger template

Layout::

blogger layout

Screenshots::

jquery featured navigation bar
blogger template

author comment highlight
well customized comments section


 blockquote and related posts equipped

Customizations::

To change navigation menu options

  • search for home, category or work and edit those links and names.
Kindly leave a comment here for any kind of assistance with the template customization.


Download::

Subscribe your email address using the below subscribe box and leave your email id in comments section. Template will be delivered to your id as soon as your subscription is verified.


Black Beauty - Social Subscription widget for Blogger


social subscription widgetI had previously shared the BT style social subscription widget uniquely created by Me. So far i didn't got time to create further widgets for blogger. Today i have come up with another eye catching social subscription widget for blogger blogs which can definitely attract each and every bloggers. This widget is uniquely created by Me and the credit of the 3D icons used in this goes to Paul Crowe. As you can notice, I have implemented a smooth and sleek Email subscribing box and spinning 3D social icons in this widget that made me to get love on this widget. Black Beauty social subscription widget takes a single step to get it placed on your blog within seconds.


DEMO

Black Beauty - Social Subscription widget by Vijay Prakash


1. Go to blogger dashboard --> Layout --> Add a Gadget ( Html / JavaScript gadget).

2. Paste the following peace of code inside it.

Black Beauty widget code

<style>
#BTsub{
width:280px;
padding:70px 10px 25px 10px;
background:#000 url(https://blogger.googleusercontent.com/img/b/R29vZ2xl/AVvXsEjNoRwWmj7HMOKPq6-yWlCO7FSi8ZAqRJT03c4b7-5WaErYuT-7btTOGEOpD0yJJ8QkV7uLMAEdyTZ59HpdQTKEkkO8pyqUOc0GD2uScVHb5uetddnjP9sz80dLKLsWZCxE_aUuqu1CWqc/s1600/bloggertricksdotbizemailbg.jpg)no-repeat top left;
box-shadow:5px 7px 5px #ddd;
-moz-border-radius:5px;
-webkit-border-radius:5px;
border-radius:5px;
}
p#BT_socialicons img {
    -moz-transition: all 0.8s ease-in-out;  
-webkit-transition: all 0.8s ease-in-out;
    -o-transition: all 0.8s ease-in-out;
    -ms-transition: all 0.8s ease-in-out;
    transition: all 0.8s ease-in-out;
padding-right:10px;
}
p#BT_socialicons img:hover {
    -moz-transform: rotate(360deg);
    -webkit-transform: rotate(360deg);
    -o-transform: rotate(360deg);
    -ms-transform: rotate(360deg);
    transform: rotate(360deg);
}
BTform.emailout{
margin:20px;
display:block;
clear:both;
padding:20px;
float:right;
}
.BTtextbox{
background:#000 url(https://blogger.googleusercontent.com/img/b/R29vZ2xl/AVvXsEhpNTFa-GI2Snp3lIExITTI6lGXmwtYG1jaGRGi9DD3DfVy4XPldzwc4BWaaacKULahc2QXHqZJsYZtR_uJyhanPO-Agc3tup-dEYrF3UvwpRPxGP45-eVPy5Dw_fQiAGP6kvlG5HVnHTw/s1600/BTMAIL.png) no-repeat scroll 4px center;
padding:7px 15px 7px 40px;
color:#666;
font-weight:bold;
font-family:Georgia,Times New Roman,Trebuchet MS;
text-decoration:none;
border:1px solid #D3D3D3;
-moz-border-radius: 4px;
-webkit-border-radius: 4px;
border-radius: 4px;
-moz-box-shadow: 1px 1px 2px #CCC inset;
-webkit-box-shadow: 1px 1px 2px #CCC inset;
box-shadow: 1px 1px 2px #CCC inset;
width:130px;
height:20px;
}
.BTbutton{
color:#666;
font-weight:bold;
text-decoration:none;
padding:6px 15px;
border:1px solid #D3D3D3;
cursor: pointer;
-moz-border-radius: 4px;
-webkit-border-radius: 4px;
-goog-ms-border-radius: 4px;
border-radius: 4px;
background: #fbfbfb;
background: -moz-linear-gradient(top, #fbfbfb 0%, #f4f4f4 100%);
background: -webkit-gradient(linear, left top, left bottom, color-stop(0%,#fbfbfb), color-stop(100%,#f4f4f4));
background: -webkit-linear-gradient(top, #fbfbfb 0%,#f4f4f4 100%);
background: -o-linear-gradient(top, #fbfbfb 0%,#f4f4f4 100%);
background: -ms-linear-gradient(top, #fbfbfb 0%,#f4f4f4 100%);
filter: progid:DXImageTransform.Microsoft.gradient( startColorstr=&#39;#FBFBFB&#39;, endColorstr=&#39;#F4F4F4&#39;,GradientType=0 );
background: linear-gradient(top, #fbfbfb 0%,#f4f4f4 100%);
}
</style>
<div id="BTsub">
<center><p id="BT_socialicons">
    <a href="http://www.facebook.com/khatab.dadi">
<img border="0" src=" https://blogger.googleusercontent.com/img/b/R29vZ2xl/AVvXsEgcorPdGtWRXGznMZHGMak1ezt2_Xx3GAjUT1uZEVikgeLWdGf-rP9YvPMyBBTaksHpCjVEokLUgqEJbcFyNnB-K0er921ucO6I3C5QrHNFPz3NlqBCBvPshJ53xRdkC_xngmQFVpthx9E/s1600/bloggertricksdotbizFB.png " /></a>
<a href="https://plus.google.com/freeeagle">
<img border="0" src=" https://blogger.googleusercontent.com/img/b/R29vZ2xl/AVvXsEhfl7mQpTIeijLWql7I5gOErmFpDl-wUve8fvohA3hcSgCYykvuMq0sn_YHFTubV5CXA0GP1cWuhtLQcfa4FLgGI0-HPIpy0UoS0SwU7X2QrvH4LMIGxvOM2Uhjwxe9OZ9qtnUgjVl41Gw/s1600/bloggertricksdotbizGP.png " /></a>
<a href="http://www.twitter.com/freeeagle18">
<img border="0" src=" https://blogger.googleusercontent.com/img/b/R29vZ2xl/AVvXsEhyoJEs3oe68eaFsn-VN4OBTYnVIygX7pKbilTQhrYXZ3tVOHb2Z2A3HcPtLKABlV4AMmvWRE62hbxktDOlhAgAX-AxhZpLIVJq20XstrGLrHjPr1rc0CDEWyQxiTRpLC2y2L-VK8iGh3E/s1600/bloggertricksdotbizTW.png " /></a>
<a href="http://pinterest.com/jackievijay143">
<img border="0" src=" https://blogger.googleusercontent.com/img/b/R29vZ2xl/AVvXsEhfNKhyphenhyphen7BmZegJAkz3scTFvWAEQ1lHkA0UodAKXDDXg7N2MM9DZG-1Kar72sKllHKJLM_X5CZYeEJQ-kmOwjKuJkvZ2LjQhmuyIzeKkyHRUiXBilXiJwfrSoWQxWc2DJIqdNBDACjiwcAw/s1600/bloggertricksdotbizPT.png " /></a></p></center>
<p style='color:#666;
font-weight:bold;
font-family:Georgia,Times New Roman,Trebuchet MS;'>Enter your Email To Receive Quality Updates Directly Into Your Inbox FREE!!</p>
<form action='http://feedburner.google.com/fb/a/mailverify' class='emailout' method='post' onsubmit='window.open(&apos;http://feedburner.google.com/fb/a/mailverify?uri=bloggertricks/BTVJ&apos;, &apos;popupwindow&apos;, &apos;scrollbars=yes,width=550,height=520&apos;);return true' style='margin: 0pt;' target='popupwindow'>
<input name='uri' type='hidden' value='Bloggertricks/BTVJ'/>
<input name='loc' type='hidden' value='en_US'/>
<input class='BTtextbox' name='email' onblur='if (this.value == &quot;&quot;) {this.value = &quot;Enter your Email&quot;;}' onfocus='if (this.value == &quot;Enter your Email&quot;) {this.value = &quot;&quot;}' type='text' value='Enter your Email'/>
<input alt='' class='BTbutton' title='' type='submit' value='Submit'/>
</form>
<p style='float:right; color:#000; font-size:10px;'><a href="http://tell-me-howw.blogspot.com/2012/08/black-beauty-social-subscription-widget.html" target="_blank">|Grab This|</a></p>
</div>

Customize

  • Replace the social links highlighted with your corresponding social profile links.
  • Replace Bloggertricks/BTVJ with your Feedburner Id.

3. Save the gadget.

4. Save Your Layout.


Social sharing Gadget with Egg Sliding Effect


social sharing
In my previous posts i have shared a lot of beautiful social sharing widgets like 4 in 1 social widget slider, floating social sharer and much more. However it is clear that each and every blog should have an social sharing widget in order to gain attention of huge number of new unique visitors from social networks. Then do you wont feel like the look and feature of various social widgets really matters in order to make your blog visitors feel like sharing your blog content?!!. The look of social widgets on your blog really matters a lot in getting your visitors to share your content on social networks. In today's post, I am giving a most beautiful social bookmarking gadget for your blogger blog with egg sliding effect on mouse hover. Then what are you waiting for!!, lets move with the tutorial.

Social sharing Gadget with Egg Sliding Effect

1. Go to Blogger dashboard --> Template --> Edit Html (Tick Expand widget template).

2. Find(Ctrl+F) </head> and paste the following code just above it.
<script src='http://w.sharethis.com/gallery/shareegg/shareegg.js' type='text/javascript'/><script src='http://w.sharethis.com/button/buttons.js' type='text/javascript'/><script type='text/javascript'>stLight.options({publisher: &quot;bea50586-2b9f-448d-947a-01385f28e305&quot;, onhover:false}); </script><link href='http://w.sharethis.com/gallery/shareegg/shareegg.css' media='screen' rel='stylesheet' type='text/css'/>
 
3. Now find for </body> and place the following code just above it.
<div style='position: fixed; bottom: 2%; left: 2%;'><div class='shareEgg' id='shareThisShareEgg'/></div><script type='text/javascript'>stlib.shareEgg.createEgg(&#39;shareThisShareEgg&#39;, [&#39;facebook&#39;,&#39;twitter&#39;,&#39;googleplus&#39;,&#39;linkedin&#39;,&#39;blogger&#39;,&#39;stumbleupon&#39;,&#39;sharethis&#39;],{title:&#39;<data:blog.pageTitle/>&#39;,url:&#39;<data:blog.url/>&#39;,theme:&#39;shareegg&#39;});</script>
 
4. Save your Template.


That's It Pals. . .  :)

How To write SEO Friendly Blog Posts


seo friendly blog postsSearch Engine Optimization[SEO] may look bit confusing and complicated to the newbie bloggers who have just stepped into the world of blogging. I can represent this situation clearly as a man standing beside a pond and wondering how depth it may be!!, without diving into the pond. Suppose if you won't dare to dive into the pond, you will surely have to search some equipment to check the pond's depth right?!!. In the same way, Search Engine Optimization is no more complicated once after you understand the strategies[depth] behind it. 

To write SEO friendly blog posts, you will have to use some equipments. Are you wondering which equipment could you choose!!?, yeah you are right. Just take a note pad on your hand and start noting the important equipments [strategies] to write a SEO friendly blog posts and start booming on search engines. Hope you got the point right!!. OK then let us discuss about the equipments required.

SEO Friendly Blog Post's Important ingredients

#1. Keyword Research

The first thing you must find is, the booming keyword but not any magical boom. Keyword in manner, the word/phrase the internet users all over the globe searching for!. I can understand that you are wondering about 'How to search for a booming keyword??'. Don't get in dilemma, there are many keyword researching tools out there on web, but i always prefer Google products. So just go through the Google Adwords Keyword research tool and start inputting few popular keywords related to your post concept and click on search button.


seo friendly

The time to be smart comes now!. In the above example i have searched for the keyword "blogger", have a glance over the alternative keywords too like "blogspot". Are you getting confused about which is the best keyword to choose!?. SEO optimization doesn't involve any confusions, newbie bloggers just get confused themselves. It is very clear in the above result chart that you must target on the keyword that has more traffic[searches] but low competition. That makes you to stand high for that keyword search on Google. So in this case, i would choose blogspot rather than blogger to write a SEO friendly blog post.

Hope you got it.

#2. Keyword density matters!!

Keyword stuffing is highly discouraged by the new algorithm of Google i.e., Google Penguin algorithm. The penguin of Google is going to smash you if you are keyword stuffing on your blog posts. Keyword stuffing means nothing but repeating your keyword so many times just keeping search engines in mind. Here is the keyword stuffed example post for you..


"blogspot going to take the lead in blogosphere but content copiers have grown wide in blogspot. blogspot team must take some action on this copying blogspot blogs and ban this blogspot users forever and so on. bla bla bla. . . .."

How was the keyword stuffing huh?!, I would be lucky to have the position atleast in last page of Google for blogspot keyword here :):). So what's the correct manner of using keyword!!?. Well you must always keep your targeted keyword density to 2-3% of the word count of the complete blog post. It means, suppose you have wrote a post of 600 words, then your targeted keyword must be repeated around 12-18 times to be smart in keyword ranking. So its time to dive in to the next SEO friendly weapon now.

#3. Post word count

Word count is one of the important factor considered by Google after the Penguin update. You must always make sure to maintain the word count of your blog posts to be atleast 500 words to be infavor of search engines. If you have existing posts with very less words count, then removing it will surely help you in maintaining the quality of your blog.


#4. Heading tags structure and Keyword usage in it

Using heading tags like h1,h2,h3 on your blog post perfectly and orderly can really help search bots to crawl your blog post clearly and obtain the perfect concept of your post. Keyword usage on your header tags matters a lot. Make sure to include your targeted keyword in h1 and h2 tags. But using the keyword in all the header tags like h1,h2,h3,h4 is discouraged.


#5. Targeted image

A prefect image with alt tag for your blog post really helps your blog post to attain more quality and it evens takes most of the part in attracting your blog visitors to read the blog post. Make sure to represent the post concept in your image itself and add the targeted keyword as alt tag to your post image. 

  • Never Ignore Alt Tag And Image Name Of Your Blog Images

#6. Post title and Permalink must include Keyword

Post title is the king of your blog post and you must always structure your blog post title smartly and SEO friendly. Make sure to include the targeted keyword in your blog post title. Permalink feature is available in all the blogging platforms today. Even blogger introduced permalink option last month. Include your targeted keyword smartly inside the post permalink to make your blog post a perfect SEO friendly blog post.

  • Title Tag And Meta Description Length For Search Engines

#7. Keyword usage in Meta description and Meta keyword

As stated in the title, use your targeted keyword in both meta description and keyword tag of your blog post. However Blogger allows you to input meta description for individual posts but adding meta keywords to blog posts is still not allowed in blogger. In this type of keyword usage strategies, use your keyword only once and don't just repeat your keyword 2-3 times in meta description tag or permalink, post title, etc.


Conclusion

I here by believe that you understood the depth of Search Engine Optimization using these 7 equipments . Just don't include content copying as the 8Th equipment in your blogging  journey and it will override all these 7 . . :) Just dive in now without fear and drive your blog post to the first page of Google like a pro. Time to grab your position now!!. Till that stay updated with my blog and subscribe below to receive further updates directly into your inbox. Kindly show your support by liking / tweeting / +1 this post. 

How To Tweak/Recycle Old Blog posts for Better SEO


Recycle
I have said in my previous post on survival from Google panda that a newbie blogger starts his/her blogging journey in first stage of blogging and starts learning new things thus stepping to next level of blogging. They even learns to survive among various bloggers and write search engine friendly blog posts, but the very big mistake they perform when stepped to second stage of blogging is, they just neglect their older blog posts written while being a newbie which are out of taste, randomly written, not at all a seo friendly blog post nor a keyword targeted blog post. Tweaking the older blog posts of your blog highly boosts your blog's seo and adds value to them and thus to your blog. In this post I will be teaching you on how to tweak / recycle your older blog posts for better seo.


According to Google Panda algorithm, few number of low quality blog posts on your blog will affect your entire blog ranking as Google panda is a domain level penalty. You really have to spend few days or a week to recycle your older blog posts and remove some of them if it is found worthless reading. Suppose if your blog contains large number of blog posts then it makes a big deal where as if your blog consists of around 100-200 blog posts, you can surely tweak them for better seo results spending a week working on them. So what does the tweaking of older blog posts really involve??. Here is the certain conditions to be followed while tweaking them.

Tweak / Recycle your Old Blog Posts for Better SEO


Keyword Research

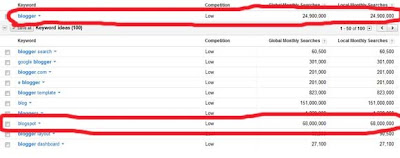
Each and every blog posts can be targeted to some keywords. Use some best keyword research tools like Google Adwords keyword tool and input few popular keywords related to your blog post and choose the best one out of alternate keywords. You can get better idea about keyword researching by reading my blog post on how to write search engine friendly blog posts.

SEO friendly Post Title

It's the post title that takes the first priority out of your blog post both in terms of users and search engines. Remove silly post titles and write a post title targeting the keyword you researched and your post title should be within 70 characters limit. Give your best time in writing a perfect blog post title and try to write post titles in how to form ending with a ? (question mark) or a top 10 list that attracts the viewers highly thus generating more CTR.

Post Meta Description

Blogger introduced search preferences option in the month of march 2012 and helped us to gain more control over our blog's SEO. Now you can write meta description for each of your individual blog posts easily and meta description is the second important factor that could grab the viewers attention in search engines. Give your best shot here and write a curious, attractive meta description for your blog posts and keep your meta description within 160 characters.

Post Image optimization

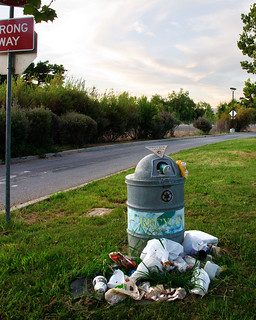
As you all know the blog post images are the third factor that is given more importance by a blog reader, Include a perfect and targeted image on each of your blog posts. Don't just grab the copyrighted images from Google search and always use your own images or use images of Flickr giving a image credit to the image owner. You can go through the creative commons license path in Flickr and search for images under suitable license thus saving your time. Don't ever forget to add your targeted keyword as the alt tag to your blog post images.

Post Words count

Don't blame me for mentioning this in many blog posts:), your post word count is an important seo factor considered by search engines and Google panda or certain algorithms. Its quite true that the blog posts with more words count grabs the highest place on search engines. Writing a blog post of atleast 600 words count is a best practice and writing a blog post of 1000 words count is the perfect practice. A lengthy blog post will also helps you in keeping more density of targeted keyword.

Keyword Density

Keep the targeted keyword density to 2%-3% of the complete words count of your blog post. Less keyword density is not a good practice and more keyword density is considered spammy by search engines. For a better idea about this, suppose if you write a blog post of about 1000 words count, keep your targeted keyword count to 2%-3% of it i.e., around 20-30 counts. It doesn't mean that you use 20 repeated keywords count in a single paragraph!, your targeted keyword density must be throughout your blog post and must not be used inside 1-2 paragraphs.

Internal Linking, External linking and Broken Link check

Internal linking is the best seo practice in effectively passing the pagerank juice all over your blog. Always internal link your blog posts by linking the keywords in the blog post to certain related posts on your blog. Never tag your internal links as nofollow. Its a recommended practice to give dofollow external links to high authority and trusted sites. Nofollow the external links only if it is pointed to any un trusted or low authority site. If you have already inter linked your blog posts then make sure to check the links whether if they are active or dead links. Having more number of broken links on your blog also impacts on your blog ranking according to Google Panda algorithm.

Usage of Heading Tags

Always keep your blog post structure easy and a newbie must also understand the flow of points inside your blog posts. Even search engines highly expects the usage of heading tags like h1, h2, h3 inside your blog posts for better understanding of your blog post structure flow. You can however style these heading tags to make it understandable to users as I have styled the heading tags of my blog posts.

Assigning Labels

Labels of your blog posts are not just a labels farm to assign silly labels / individual labels for each of your blog posts thus keeping 20-30 labels on your blog. Labels play an very important role in reducing the bounce rate of your blog where as high bounce rate is one of the factor to get affected by Google Panda algo. Do you know how it 
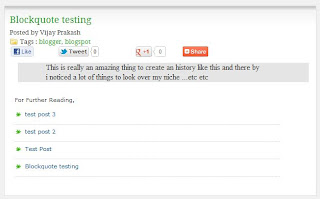
reduce bounce rate??. Today each and every bloggers use some sort of related / recommended posts widget on their blog and these widgets fetches related results depending on the label of the blog post. A blog post labeled SEO must always show SEO related blog posts to keep the visitors flowing around your blog posts for a long time. So make better usage of labels and don't neglect it.

Keep an Eye on Grammar mistakes

Hope you understood this point. Making grammar mistakes is a very silly thing and spend a minute to read your blog posts after completing each blog post. Use proper punctuation and symbols on your blog posts, avoid writing non stop English paragraphs without a comma or full stop.

A Note on Permalinks

Blogger doesn't allow you to change the permalink of a already published blog. Never try to change the permalink of the already published blog posts and that definitely increases the number of broken links on your blog.

Conclusion

Following these conditions will definitely boost the SEO score of your blog posts and a blog post with these ingredients can never be affected by any type of existing or upcoming algorithms of Google. I have tried my level best to write this blog post in normal English keeping the layman English out of this blog post. Kindly let me know if your find difficult in understanding any of the concept explained in this blog post. Like or share this post with your social friends if you agree with this post. Take Care, Happy blogging pals:).

Add Open Graph Meta Tags For Blogger

add facebook open graph meta tags in blogger

The Facebook open graph meta tags enables web pages to integrate into social graph and provide ability to treat your page like Facebook page and also helps your +1ed web page to be integrated into social graph if you have added plus one button on your blogger blog.

Social networks like Facebook,Google+ can collect structured information about your blog posts and pages by adding open graph meta tags to your blog.


Tutorial On How To Add Open Graph Meta Tags To Blogger::

1. Go to your blogger dashboard --> Template --> Edit hmtl. 

2. Find for <html and add xmlns:og='http://ogp.me/ns#' at the closing end of this tag like this.
<html...................................xmlns:og='http://ogp.me/ns#'>
3. Now find <head> and add the following code just below it.
<b:if cond='data:blog.pageType == &quot;item&quot;'>
<meta expr:content='data:blog.pageName' property='og:title'/>
<meta expr:content='data:blog.canonicalUrl' property='og:url'/>
<meta content='article' property='og:type'/>
</b:if>
<meta expr:content='data:blog.title' property='og:site_name'/>
<b:if cond='data:blog.postImageThumbnailUrl'>
<meta expr:content='data:blog.postImageThumbnailUrl' property='og:image'/>
<b:else/>
<meta content='http://www.your-blog-logo.jpg' property='og:image'/>
</b:if>
<b:if cond='data:blog.metaDescription != &quot;&quot;'>
<meta expr:content='data:blog.metaDescription' name='og:description'/>
</b:if>
<meta content='Your-App-ID' property='fb:app_id'/>
<meta content='Your-Facebook-Profile-ID' property='fb:admins'/>

  • Change the text in Red with your configuration.

How This Open Graph Work !!??::(Think you are sharing a post of your blog on facebook)

1.
<b:if cond='data:blog.pageType == &quot;item&quot;'>
<meta expr:content='data:blog.pageName' property='og:title'/>
<meta expr:content='data:blog.canonicalUrl' property='og:url'/>
<meta content='article' property='og:type'/>
</b:if>
This IF condition code structure instructs facebook to fetch your blog post title and post url is you are sharing a post of your blog.

2.
 <meta expr:content='data:blog.title' property='og:site_name'/>
This instructs facebook to fetch your blog title as site name while sharing.

3.
 <b:if cond='data:blog.postImageThumbnailUrl'>
<meta expr:content='data:blog.postImageThumbnailUrl' property='og:image'/>
<b:else/>
<meta content='http://www.your-blog-logo.jpg' property='og:image'/>
</b:if>
This IF condition code structure instructs facebook to fetch your post image as thumbnail if you are sharing a post and instructs to fetch your blog logo as thumbnail when sharing your blog home page.

4.
<b:if cond='data:blog.metaDescription != &quot;&quot;'>
<meta expr:content='data:blog.metaDescription' name='og:description'/>
</b:if>
These tags instructs facebook to fetch your blog description stored in meta tags while sharing your blog.

Five Ways To Increase Your Blog Loading Speed For Gaining More Traffic


blog loading time

Increasing the loading time of  blog is one of the necessary step that every bloggers should take in order to gain more traffic to their blog. Blog load time plays an effective role on the patience of visitors whose patience is very valuable to us and suppose if your blog takes a lot of time to load completely, then the blog visitor will loss his patience and he just thinks of exiting from your blog, this makes your blog content no worth. So visitors patience is very important in bringing a worth for your blog contents. So in order to make your blog visitors feel convenient with your blog loading speed, it is necessary for you to follow some basic tips on increasing your blog loading speed. So i am writing this post for helping you on the same.

Major Disadvantages::
  • Visitors feel discouraged and never think of visiting your blog again.
  • Google loves to serve blogs with fastest loading time and penalizes the blogs with slower loading speed.
  • The IE just gets crashed when a page takes a long time to load.
  • This is one of the cause for major loss of valuable visitors to your blog as people tends to leave your blog as soon as possible.
  • Peoples wont feel like sharing your blog content on social networks.

  • Note:: Please keep an original copy for further editing before using any of the below compressions.

5 Ways To Increase Your Blog loading Speed And Gain More Traffic::

1. Compress Images

Sometimes my blog takes a bit more time to load because of some images on my blog which are of  large size. In order to keep same image of large size on my blog, i use to compress those large size images before uploading it to blogger and this makes my blog to load faster as before with the same images included. This illustrates that, it is necessary to compress your images before uploading to blogger and you can use the Smush It  tool from Yahoo to compress your image size.

2. Compress Css

Compressing your blog's Css leads to lot of improvements in your blog loading time and as-usual this will decrease your blog size and ultimately increase your blog loading speed. Css Drive helps you in doing your css compression efficiently.

3. Compress JavaScript

In most of the web pages, i have noticed that some java-scripts takes a long time to load and i felt JavaScript compression is necessary for these bloggers and here is the best tool to compress your JavaScript files.

4. Compress HTML

As the whole blog consists of chock full of Html codings, compressing your blog Html will surely brings a big  rapid change in your blog loading speed. So use this Html Compressing Tool to compress your blog html.


5. Choose Widgets Wisely

This is the last step you should take for efficiently increasing your blog loading speed. Many widgets on the blogosphere today takes a long time to load and these widgets just holds your blog from loading and leads the blog visitor to get discouraged, So it is highly important to choose your blog widgets wisely and never implement lot of widgets on a single blog.
I Hope These Will Bring A Rapid Change in Your Blog. .

That's It Pals. ..